- Desktop Apps with Avalonia UI and F#
- TLDR;
- Revisiting Desktop Apps
- Windows only
- Xaml = Meh
- Can we do better?
- WPF -> AvaloniaUI
- Xml -> Code
- From View classes…
- …To View methods…
- …With Object Initializers
- Improvements
- C# -> F#
- ViewModels -> State
- Reactive Extensions
- AppBuilder Extensions
- Missing Preview / Designer
- Preview Images
- Free screenshots
- Example App: Timeboxing
- Summary
- References
Desktop Apps with Avalonia UI and F#
TLDR;
You can write cross platform desktop applications using AvaloniaUI, F# and Reactive Extensions instead of WPF and C#. You can take a look at an example Application called Timeboxing here.

Revisiting Desktop Apps
Lately I’ve been revisiting how to best write desktop applications using dotnet. In the past, I’ve mostly used WPF and while it got the job done, there were a lot things that could have been improved upon.
I chose to focus on the two problems that I found to be the most annoying:
- Windows only
- Xaml
Windows only
In my eyes a big disadvantage of using WPF is that it only runs on Windows.
Nowadays, with dotnet core running great on Linux and Mac and WPF being available to a dotnet core application you would assume WPF to run on those platforms as well - but sadly you’d be wrong, because WPF still does not run on anything else except for Windows.
Xaml = Meh
Using Mvvm and Bindings made at least the ViewModel code testable and restricted the ugly parts to the views, which I found to be the most troublesome part of the development experience.
The reason for this is, that Views are usually declared in Xaml and by writing Xaml you have to leave your trusty programming language behind. By doing that that, you lose all your existing tools that your programming language provides and trade it in for… some xml?!
This in turn renders even trivial tasks like negating booleans or converting data into painful endeavours of figuring out how every basic thing that you have been taking for granted can be done in this new environment.
But it’s not like a speed bump, that just slows you down one time when getting started, like learning a new API or writing some glue code. It’s stays a continuous problem, because you need to consume it in a way that’s both verbose and irreducible, so it does not get better much better over time.
Take for example negating a boolean. In C# you would just prepend ! and be done with it. But in Xaml, you would need to implement an IValueConverter in a separate file, reference it in the xaml and use it in the binding.
There are of course several other solutions to that problem, all with different tradeoffs, but the mere fact that a trivial problems does not have an equally trivial solution is exemplary for Xaml.
Can we do better?
So the question then becomes, how can we do better? I started to look at the crossplatform issue first, which is more fundamental as it is dictated by the UI-Framework that you are using.
WPF -> AvaloniaUI
There are a couple of cross platform GUI Frameworks out there and doing a detailed comparison between even two such frameworks would be huge undertaking on moving targets - so I am not going to do that.
Also I don’t want do any of those projects a disservice by adding what little experience I have of using them and will therefore not even mention those that I looked at and didn’t pick, instead I just want to heave praise on the one I did.
So I’ve tried a couple of frameworks and the best solution for me was AvaloniaUI.
If you are looking for a cross-platform UI Framework for .NET, I highly recommend checking out AvaloniaUI, especially if you are coming from a WPF background. AvaloniaUI has all the best parts of WPF and in my opinion improves on a couple of them as well, e.g. styling and binding.
For example, AvaloniaUI solves the previously mentioned problem of negating a boolean value in a Binding by supporting the “Bang” (!) operator directly in the Xaml Binding Syntax.
They also ship their own Designer Extension for Visual Studio and if you are using Jetbrains Rider you’ll find that they have recently also started shipping support for editing AvaloniaUI xaml and added a control preview.
The feature set is great, the code is great - for me, AvaloniaUI is what WPF should have been.
Xml -> Code
Additionally, as I’ve mentioned earlier, I had a hunch that using normal code instead of xaml could result in a superior experience developing applications - at least for me.
To try out my theory, I’ve decided to built a small sample application using that approach to figure out what works and what doesn’t.
From View classes…
The best practice when working with xaml is to create a class for each view. So the most straighforward way to transition from xaml to code is to do just that.
public class MainView : UserControl
{
  public MainView()
  {
    this.Content = ...
  }
}
…To View methods…
But I’ll found that creating them as classes is just the default - it doesn’t add anything. Why not instatiate a UserControl and set it’s Content property directly?
public UserControl GetMainView()
{
  var mainView = new UserControl();
  ...
  return mainView;
}
That’s much better as methods are way less rigid and better composable than classes.
…With Object Initializers
Also you’d want to use a declaration like approach to create the controls, not an imperative one. So e.g. instead of writing:
var mainView = new UserControl();
var border = new Border();
mainView.Content = border;
var grid = new Grid();
border.Child = grid;
...
Which obfuscates the hierachy of the controls and is just generally really hard to read and write, you’d probably want some variant of the following:
new UserControl {
  Content = new Border {
    Child = new Grid {
      ...
    }
  }
}
Improvements
From a coding perspective this is tons better than Xaml, but sometimes you run into problems, because not all parts of the API is designed with an approach like that in mind. E.g. Collection properties that only have getters but no setters or creating and assigning styles and so one.
To work around those issues and get a better declaration-like approach, I wrote a couple of extension methods that I could invoke to keep this declaration style going without falling back to intermediate variables, which improved the code legibility a lot.
The result was a somewhat fluent API that takes in an object, mutates it and returns it again and allows you to keep going with the declaration based approach. It would probably be best to use the Builder pattern for the same approach, but that’s waaay more wrapper code than I was willing to write. So the downside was that it was rather inconsistent - there was a mix of pre-existing properties and some extension methods that you would need to chain.
C# -> F#
Then I switched to F#, which I found better suited to that approach. For example, it allows extending types with properties that can then be invoked in the constructor, which allowed me to further simplify the code. It also cuts down on some uses of brackets and commas, but far less than the marketing material would make you want to believe.
For example you can define extension properties for common operations like setting the grid row and column like so:
// extend all controls with the grid row / column properties
type Control with
  member this.Row
    with get () = Grid.GetRow (this)
    and set row = Grid.SetRow (this, row)
  member this.Column
    with get () = Grid.GetColumn (this)
    and set column = Grid.SetColumn (this, column)
  member this.ColumnSpan
    with get () = Grid.GetColumnSpan (this)
    and set columnSpan = Grid.SetColumnSpan (this, columnSpan)
  member this.RowSpan
    with get () = Grid.GetRowSpan (this)
    and set rowSpan = Grid.SetRowSpan (this, rowSpan)
Then you can just set the rows and columns properties directly when declaring the control:
Border (
  Child =
    Grid (
      ColumnDefinitions = ColumnDefinitions "*, Auto",
      Children = [
        Button (Column = 1, ...)
      ]
    )
)
ViewModels -> State
To connect the views with the actual data, you can just write a ViewModel, like usually, by deriving from ReactiveUI’s ReactiveObject class and implementing observable properties that can be bound by assigning a Binding in the View’s declaration and that works as you would expect.
But I found that declaring the ViewModel classes required a lot of boilerplate code and was also actually one of the few things that I found harder to do in F# that in C#. Also binding them in the view using a string kind of doesn’t make sense if the View is written in Code anyway, because you could have verified those bindings at compile time instead of looking for the binding errors at runtime.
Reactive Extensions
While reactive extensions do have a learning curve, I do prefer them to easier approaches like INotifyPropertyChanged or Redux. While the latter approaches are easy to get started with, I find that there a certain scenarios for which they are just a bad fit.
So in the end I stuck with using Observables directly, which makes the binding code strongly typed but I got rid of all the ViewModels boilerplate code, looking at you ReactiveObject, SetAndRaiseIfChanged, PropertyChangedHelper and all of your many friends.
AppBuilder Extensions
After getting rid of the UserControl, Window on ViewModel classes, I’ve added a couple of extension methods for the fluent AppBuilder to get rid of writing a custom Application class just to select the theme or the mainwindow, which further cuts down on the boilerplate code and you are left with:
AppBuilder.Configure<Application>()
  .AddStyleFluentDark()
  .UsePlatformDetect()
  .UseMainWindowFactory(mainWindowFactory)
Missing Preview / Designer
Now there was one major issue left: no designer preview!
The reason is that the designer preview only works for .xaml files and classes and I’ve burned that bridge. One workaround is of course embedding the view in another control class based control and opening that one in the designer, but that’s back to boilerplate central.
While I’ve never used the designer in WPF for actual editing, I was definitely missing the preview, because spinning up the application continuously while you are working on the UI just doesn’t cut it.
In WPF, you could have built a primitive previewer yourself, by instantiating the control, calling Measure() and Arrange() on it and using RenderTargetBitmap to render it to an png… and this is where the similarities between AvaloniaUI and WPF were really useful, because the same approach works perfectly for Avalonia as well!
Preview Images
I ended up writing simple integration tests that can render a control to a png.
[<Fact>]
let mainViewTest () =
  renderSizeAuto "mainView" (State.init >> mainView)
So when I am working on the controls I just mark those tests to be continually executed on a code change.
This works great in Visual Studio with nCrunch. In Rider I am using the continuous testing mode to achieve a similar effect and I guess you can do it using dotnet watch as well if your are working in vscode or something else. Then you just need to open the files you are interested in a tool that reloads them on changes, e.g. vscode.
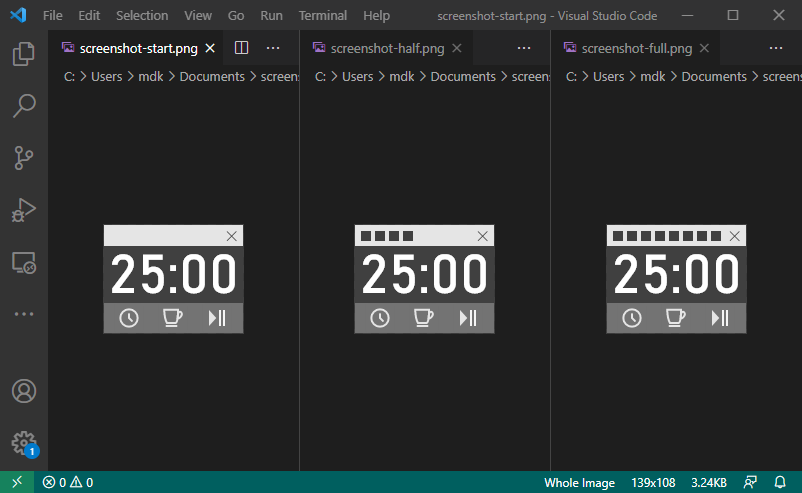
Suprisingly I found this approach to work better in some cases than using an integrated designer. While it’s slower, it’s also way more flexible because you can have multiple views of a control with different states visible at the same time. E.g. a progress bar that is empty, half-filled and full.
This fits nicely with the fluent ApplicationBuilder approach to configure the themes, which allow you to generate previews of the controls using different themes as well.
You can an also try out how the control scales to different sizes.
Free screenshots
As an added bonus, you automatically get screenshots of your application that you can use in a blog post or your documentation and that you can review for visual regressions without running your application yourself or using UI Automation.


Helping out QA and contributing to the documentation of the project never felt so effortless!
Example App: Timeboxing
I’ve thrown together a sample application that demonstrates that approach. It’s called Timeboxing and available on github and it’s basically a glorified countdown timer. If you are interested about it’s usecase, you can take a look at the wikipedia article about timeboxing or why I find it useful.
The UI is pretty self-explanatory and looks like that:
Summary
When developing desktop applications I’ve switched out the following things:
- WPF -> AvaloniaUI
- C# -> F#
- Xaml -> Code
- Views / UserControls -> Functions
- ViewModels + Bindings -> Functions + Oberservables
- Designer -> Preview Images
I’ve found developing an application with that stack way more enjoyable, while improving the output as well.
So far so good, but this was only a small, single application and the question remains: What if the size of the application increases? Will this approach scale? I don’t know yet, but the simple architecture makes me rather optimistic and I am looking forward to find out.
References
- AvaloniaUI (https://github.com/AvaloniaUI/Avalonia)
- F# (https://fsharp.org)
- Reactive Extensions (https://dotnetfoundation.org/projects/reactive-extensions)
- Timeboxing Github Page (https://github.com/8/timeboxing)
- Inverting a property (Stackoverflow)
- Wikipedia article about timeboxing (https://en.wikipedia.org/wiki/Timeboxing)